Tutorial - Scenario Builder Basics
Wed Apr 23 2025125 viewsOften AV/ADAS developers require a dataset within a specific domain or situation whether because they have identified gaps in their models performance, to be compliant with key, high priority scenarios identified by regulators, and so forth. Unprotected left turns, highway merging, and avoiding vulnerable road users are all examples of these safety critical scenarios. However, the time it takes to record or identify a sufficiently large dataset for any specific scenario, regardless of how common, can bottleneck the development and V&V process, costing developers time and money. Even if an instance of the desired scenario is found, it is useful to augment the dataset by changing environmental factors like the surrounding traffic or road geometry.
The Inverted AI APIs specialize in sampling a massive coverage of realistic, reactive, and diverse driving behaviors but there is also a way to extract specific, narrow subsets of human driving. With the Inverted AI Scenario Builder tool, it is straightforward to acquire the necessary dataset you need to train or test your system. This blog post will cover the basics of how to use this tool for maximum potential.
Scenario Builder Tool Access
Sign up for an account and then log in to your Inverted AI portal. The Scenario Builder tool will be accessible via a button in the top right corner of the web page.

Once you’ve clicked on this button and confirmed your API key, you will see a page like this.

Exploring Locations
The first thing that is needed to generate a scenario is to prepare the location in which the scenario will take place. All available locations under your API key will be available through this drop down menu. There may be some maps for which you have access but do not appear in this list. In this case, copy & paste the location string in the form of domain:location_name into this field and the map will load into the Scenario and Play Scenario windows.

Once the map has loaded, various pseudo-random seeds will be sampled. These seeds can be viewed and changed in the Random Seed menu in the top left. If the location has traffic lights, like in the example below, the traffic lights will be set into a randomly selected viable state but you can change this manually or by selecting a new traffic light seed.
You can explore the map most effectively by using the Rendering FOV slider and the Set Map Center button. Click on the Set Map Center button then click on the Scenario window. Centering above the desired point on the map is necessary to initialize agents in the area of interest to your scenario. Furthermore, spinning the mouse wheel allows you to zoom in and out, allowing you to examine the scenario in greater detail.

Initialize and Drive a Simple Scenario
The bread and butter of Inverted AI APIs, INITIALIZE and DRIVE, are available in the Scenario Builder tool as well. Set the map center onto the point of interest in the location of choice, adjust the number of agents with the sliders, then click Initialize New Scenario and let the INITIALIZE API sample a realistic scenario for you.

A more advanced tool for setting up a scenario is Tiled Initialize. This allows you to select multiple initialization centers within which you may place a number of agents. This is helpful for filling out a large map with agents or to target multiple specific areas of interest like intersections or on-ramps. Click the Tiled Initialize toggle button, click the Adding Map Centers toggle button, then click on the map. Adjust the Tiled Initialize Agents per Tile slider and click Initialize New Scenario then the Scenario Builder tool will attempt to place that many agents at each initialization center.

Once you have set up the scenario, you might want to examine how the agents will behave. To do this, adjust the Simulation Length slider to the appropriate duration in seconds, then press the DRIVE button under the Play Scenario window. This will call the DRIVE API, at the default rate of 10 calls per simulated second, and shows you how the scenario will roll out. This can be useful for producing a log or just to confirm how the Inverted AI agents will behave.

Modifying Agents
The Scenario Builder tool allows an even greater degree of control on the scenario by allowing you to modify the state of individual agents. Click on an agent and several options will become available. Click and drag the agent to translate it elsewhere in the map then click and drag the red orientation arrow to rotate. You will furthermore be given a menu to alter other aspects of agent states like instantaneous speed, maximum speed (useful for enforcing a slow driver for example), or removing agents from the scenario entirely.

Importing/Exporting
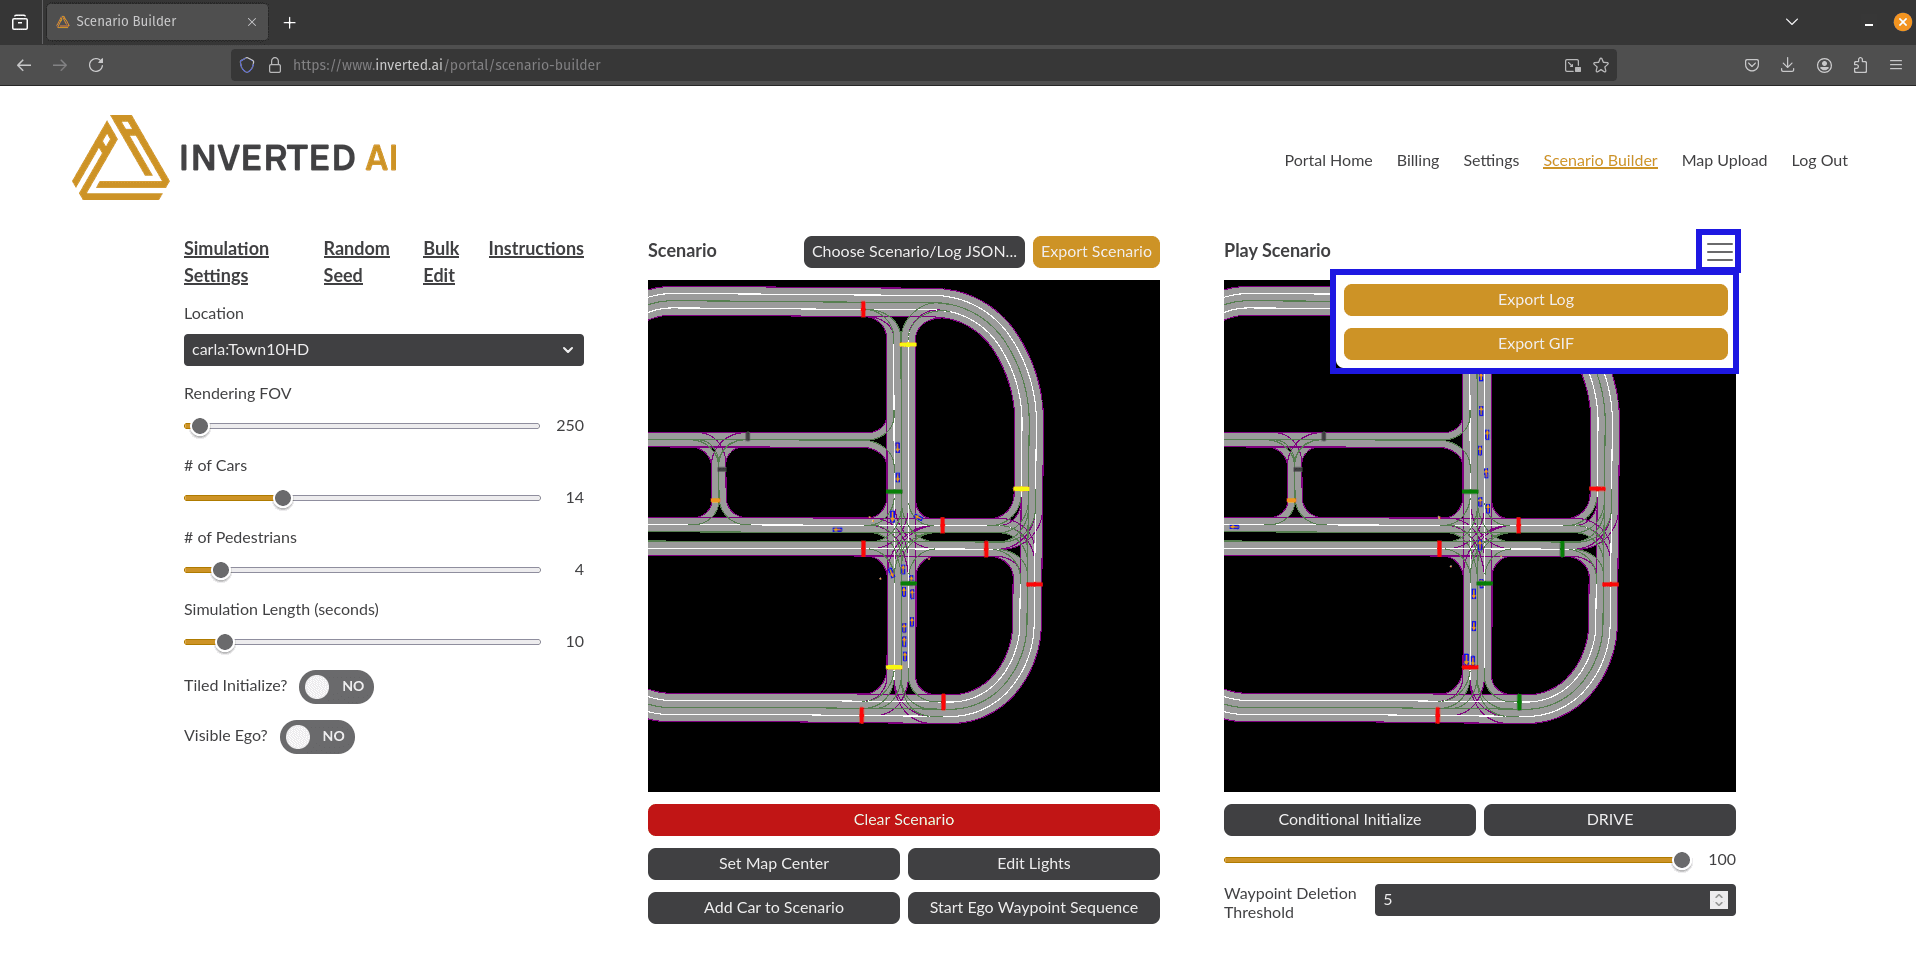
Once you have generated, modified, and verified your scenario, you’ll need to save your work for future use. Clicking the Export Scenario button generates and downloads a JSON log that contains information regarding the location, traffic light information, agent information, and anything else necessary to replay this scenario in the Inverted AI API.

If you have rolled out the scenario beyond the initial time step, you can similarly export a log containing all agent state data across all time steps. Click the drop down menu, then click the Export Log button to generate and download this log and/or click Export GIF to save a visualization of this rollout.
Scenarios can be imported as well! This is useful for fuzzing an existing scenario by modifying it with all the features available in the Scenario Builder tool. An example is shown below where a single agent is moved to see how the agents handle a safety critical scenario, similar to an NCAP scenario, where a vehicle has violated a red light.
Click the Choose Scenario/Log JSON… button and find your scenario file in your file browser. Once the scenario is uploaded, the Scenario Builder tool will snap to the specified location with the specified FOV, number of agents, and so forth.

Contact us for more information on how you can augment and accelerate your AV/ADAS development today!